
If you listen to or watch Kim’s show, you know she loves to travel — especially to her vacation home in Hawaii. Because she’s a savvy traveler, she’s always looking for life hacks and tricks to make the most out of every trip. That’s why she’s shared with us three essential safety tricks she uses when she travels.
The first recommendation is one you might have heard her say before. It’s worth remembering, however, because it’s a game-changing trick for frequent flyers that want to get through airport security faster than ever.
Kim’s also sharing two practical tips for your travels. One will save you from the headaches that come from relying on technology too much. The other is a little security tip that can keep your devices safe and out of the hands of thieves. You won’t want to miss this.
Mobile Passport gets you through TSA faster
One of the most annoying things about flying is going through security. Thankfully, there’s a range of app-based solutions that make the process easier.
One incredibly useful travel app, especially if you fly internationally, is Mobile Passport. Kim has been recommending it for years, and she still gets people thanking her all the time for saving them time at the airport.
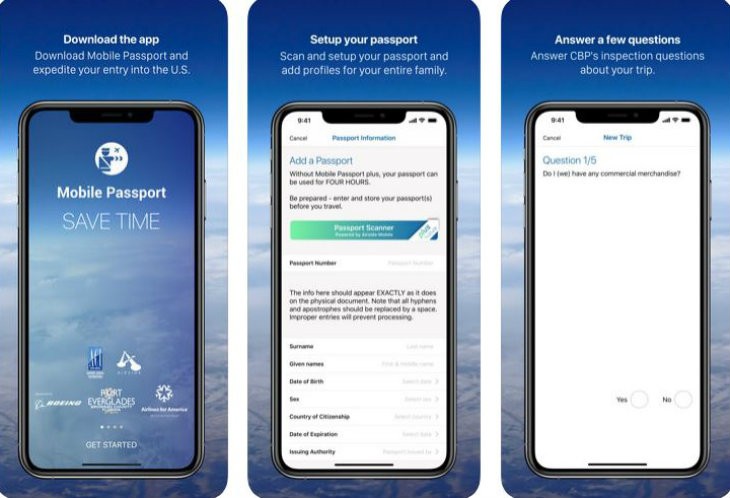
Passports are the key to crossing borders, but they can be a source of anxiety and panic if you happen to lose yours. This app lets you upload all of your passport’s information right to your smartphone!
The standout feature of Mobile Passport is that it allows you to skip over U.S. Customs and Immigration lines (the app was jointly developed with U.S. Customs and Border Protection).
Currently, you can utilize its features at 25 U.S. airports and three cruise ports — mostly in large cities like New York and Atlanta. As USCBP continues to roll out the app’s infrastructure, you can expect it to appear at more airports going forward.
To get your hands on Mobile Passport, tap or click the links below for your mobile operating system.
Take screenshots of your documents
Going paperless when we travel is great, but what happens if you’re standing in a long line at TSA and, when it’s your turn, you get to the podium and — your Wi-Fi doesn’t work? Or, what if you lose your wallet, your passport, your boarding passes?
I take photos of my important documents and screenshots of my mobile boarding passes. Not only do I do that and save them on my phone, but I also save them on the cloud — and I email them to myself. That way, if I lose my device, I can log onto a borrowed computer and access my documents.
Thankfully, this has never happened, but I’m prepared if it does. Make a list of things you should screenshot:
Most of us are trying to go “paperless” in so many different ways. From our bills to our credit card statements, it’s just easier to keep all of your information digital.
Sometimes, though, over-reliance on our tech (especially the internet) can put us in a bad spot. Let’s say you’re in an airport with poor service. How will you access your documents from the cloud in that case?
It is possible, though, to stay paperless and have local copies of your information by taking photos or screenshots of them. A screenshot of your boarding pass that contains the barcode is still valid for scanning at the gate, and TSA officials have become more accepting of digital copies of specific documents (provided they’re not legal ID like a passport, mind you.)
Even still, it’s worth having a screenshot of your passport and license anyway for reference purposes. Other important documents you should consider photographing or screenshotting are:
- Passport and driver’s license
- Boarding passes
- Confirmation from hotels, car rentals, reservations
- Your parking space at the airport
- Credit cards
The way you take a screenshot on a device depends on the operating system it’s running. Both Android and iOS are capable of the feature, however.
Click or tap to learn how to take a screenshot on Android.
Click or tap to learn how to take a screenshot on iPhone.
Turn off GPS, Bluetooth and Wi-Fi

If you’re abroad, it’s very likely you’ll be either without service or relying on a foreign carrier for data. If you’re not connected to a network, though, it’s highly recommended that you disable your most vulnerable wireless features. This goes double for crowded areas where hackers and cybercriminals are potentially lurking.
Keeping Wi-Fi active can potentially allow a hacker to know which networks you’ve connected to in the past. A particularly determined hacker could easily set up a fake version of a familiar network with the same name — which would trick your devices to connecting automatically.
This would open the door to digital theft or further attacks. Bluetooth can be vulnerable to cyberattacks as well, as seen in the BlueBorne attack researchers discovered last year.
One unlikely, but still worrying threat is GPS spoofing. If a hacker was willing to use the proper equipment, they could spoof GPS signals to your phone and use fake maps to mislead you wherever they choose. Now, of course, you wouldn’t be fooled in familiar territory — but in a city you don’t know very well, it could put you in real danger.
To fight all of these signal-related issues, as we mentioned, your best bet is to just disable them altogether. The method to do so depends, once again, on the operating system your device is using.
On iPhone 8 models and below, you can easily access your wireless settings by swiping up from the bottom of your screen. Or, down from the top right corner of your screen on iPhone X models and above.
This brings up your Control Center, which is a selection of quick settings options. On the upper left corner of the Control Center, you’ll see several icons — including one with an airplane. Tap that button to disable all of your wireless settings instantly in Airplane Mode.
If you’re using wireless service but just want to disable Wi-Fi and Bluetooth, tap the Wi-Fi icon and Bluetooth icon in the Control Center but leave the Antenna shaped icon alone. This will disable all antennas but your wireless network service.
On Android, all you’ll need to do is opening the Settings app. At the top of the screen, you’ll see menu options for both Wi-Fi and Bluetooth. Tap either of these, and you’ll be taken to a menu with a list of possible connections — as well as a toggle to turn the service on or off. Turn both of them off and your antennas will immediately go to sleep.
BONUS: Use a secret word
When Kim traveled with her son while he was young, the two of them came up with a secret code word that meant “I’m in trouble” in the event of a worst-case scenario.
Fortunately, she never had to use it, but the technique is a great way to be discrete when you feel like you need to leave an area. It’s also useful if you don’t want people around you to know what you’re talking about.
When creating a “code word,” only you and your immediate family (or whoever you’re traveling with) should know what it means. If you’re in trouble, you can text the secret word to your family, and they’ll know it means you feel unsafe.
Likewise, if a stranger approaches and tells you that your family is in trouble and you need to come with them, you can verify their sincerity by asking them what the secret password is. If they don’t know it, you’ll know they’re not to be trusted.
Traveling can have its risks, but overall, you can enjoy yourself to the fullest if you practice basic precautions and stay on the safe side.
Keep your wits about you, stay out of trouble and happy travels!